Fish Tank Cleaning: Keep Your Aquarium Healthy
Algae on the glass, murky water, a faint smell when you lift the lid — most aquarium problems trace back to one thing: an inconsistent cleaning routine. The good news is that a well-maintained tank rarely needs a total teardown. A steady schedule of small tasks protects water quality far better than one heroic scrub every few months.
This guide walks through every layer of aquarium maintenance, from daily checks to the deep cleans you do only a few times a year.
What Does “Clean” Actually Mean for a Fish Tank?
A visually clean tank and a chemically safe tank are not the same thing. Water can look crystal-clear while carrying dangerous ammonia or nitrite spikes. Conversely, slight green tinting from algae does not necessarily harm fish. True cleanliness means:
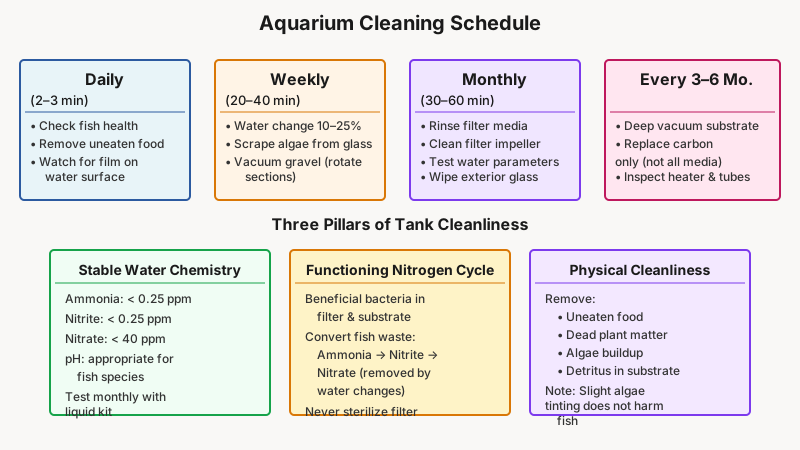
- Stable water chemistry — ammonia and nitrite near zero, nitrate under ~40 ppm for most species, appropriate pH.
- A functioning nitrogen cycle — beneficial bacteria in the filter and substrate that convert fish waste into less harmful compounds.
- Physical cleanliness — no rotting food, no dead plant matter, no heavy algae coating surfaces.
Keeping these three pillars in balance is the entire job.
The Cleaning Schedule That Actually Works
Frequency matters more than intensity. Here is a tiered schedule that covers all the bases without exhausting you or stressing your fish.
If you struggle to stay consistent with any chore rotation, How to Make a Weekly Cleaning Schedule That You’ll Actually Stick To offers a practical framework for turning this schedule into a habit you’ll keep.
Daily (2–3 minutes)
- Check that fish are swimming and eating normally.
- Remove uneaten food after feeding with a net or turkey baster — decaying food is the fastest route to an ammonia spike.
- Glance at the water surface; excessive bubbling or a film can flag a filtration or oxygen problem.
Weekly (20–40 minutes)
- Water change: Replace 10–25% of the tank volume with dechlorinated water matched to tank temperature. This dilutes accumulated nitrates and replenishes trace minerals that fish use. How much to change depends on stocking level — a lightly stocked planted tank can get away with 10%, a heavily stocked cichlid tank may need 30%.
- Glass scrubbing: Use an algae scraper or magnetic cleaner on inside surfaces before the water change, so you suck up any dislodged debris.
- Gravel vacuuming: Work a siphon through the substrate to pull up detritus. You don’t have to vacuum the whole bottom every week — moving through different sections on a rotation keeps disturbance low.
- Trim dead plant leaves. Decaying plant matter releases ammonia just like fish waste does.
Monthly (30–60 minutes)
- Rinse filter media in old tank water (not tap water — chlorine kills the beneficial bacteria that live on the media). Squeeze sponges gently; you are removing silt, not sterilizing.
- Check and clean the impeller on power filters — a dirty impeller reduces flow and can cause the motor to overheat.
- Wipe the exterior glass, hood, and any light fixtures with a damp cloth.
- Test water parameters with a liquid test kit rather than strip tests, which are less accurate.
Every 3–6 Months
- Deep vacuum the substrate more thoroughly, reaching into corners and under decorations.
- Replace only the carbon cartridge (if used) — never replace all filter media at once, as you will crash the nitrogen cycle.
- Inspect airline tubing, air stones, and any heater for wear or calcium buildup.
- Clean the heater tube with a soft cloth; calcium deposits reduce heat transfer.
If deep cleaning ever leaves your kitchen smelling of fish, How to Deodorize a Kitchen Smelling of Fish or Onions explains how to clear the odor for good.
How to Do a Water Change Without Harming Your Fish
A water change done badly is more stressful than no water change at all. Temperature shock and chlorine are the two main hazards.
- Prepare replacement water first. Fill a clean bucket or separate container with tap water. Add a dechlorinator (sodium thiosulfate-based products work within seconds; some also neutralize chloramine, which many municipal supplies now use — check your water report). Match the temperature to the tank within roughly 1–2°C (2–4°F).
- Siphon from the bottom, not the surface. A gravel vacuum siphon removes detritus as it removes water — two tasks in one.
- Pour in slowly. Directing new water against the glass or a decorative rock breaks the flow and prevents a cold jet hitting fish directly.
- Do not change more than 30–35% at once in an established tank unless you are treating a crisis. Large sudden changes shift pH and hardness faster than fish can acclimate.
Cleaning the Filter: The Most Misunderstood Step
The filter is the heart of the nitrogen cycle. Most beginners either clean it too rarely (it clogs and flow drops) or too aggressively (it kills the bacteria and the cycle crashes).
What to do:
- Rinse mechanical media (sponge, floss, ceramic rings) in a cup of water you have siphoned from the tank — never under the tap.
- Squeeze the sponge until the squeeze-out water runs relatively clear, then stop. Mashing it completely defeats the purpose.
- Leave biological media (ceramic rings, bio-balls) alone unless they are visibly coated in sludge. Even then, a gentle rinse is enough.
- Never clean the filter and do a large water change on the same day. Space them a week apart so the bacterial colony is not hit by two stresses simultaneously.
When to replace media: Carbon cartridges are typically exhausted in 2–4 weeks. Foam sponges last years if rinsed regularly. Ceramic biological media rarely needs replacement — it can last the lifetime of the tank.
Dealing With Algae: Types and Targeted Fixes
Not all algae is the same, and the cleaning approach should match the type.
Green spot algae — hard green dots on glass. Caused by low phosphate or excess light. Scrape with a razor blade (acrylic tanks need a plastic scraper) or a stiff algae pad. Address root cause: reduce light hours or add a floating plant.
Brown algae (diatoms) — a soft brown film, common in new tanks. Usually self-resolves as silica in tap water is consumed. Wipe off with a cloth; nerite snails eat it enthusiastically.
Green water (suspended algae) — the whole tank turns pea-soup green. Almost always caused by too much direct sunlight or too much light on a timer. Move the tank away from windows, reduce light to 8 hours, and run a UV sterilizer if the problem persists.
Black beard algae (BBA) — dark tufts on plants and hardscape. Notoriously stubborn. Dose Excel (glutaraldehyde-based) carefully per manufacturer instructions, or spot-treat with undiluted Excel using a syringe. Fixing CO2 and flow fluctuations prevents recurrence.
Saltwater and Reef Tank Cleaning: What Changes
Saltwater tanks share most steps with freshwater but add a few layers.
- Salinity must be maintained. Evaporation concentrates salt — top up with fresh RODI water, not more saltwater, to restore volume. Test specific gravity or salinity weekly with a reliable refractometer.
- Protein skimmers pull dissolved organics out before they break down. Clean the collection cup every few days — a thick, dark skimmate is normal; pale watery skimmate suggests the skimmer needs tuning.
- Live rock and sand act as biological filtration. Avoid disturbing deep sand bed layers during vacuuming; the anaerobic zone below a few centimeters handles nitrate reduction.
- Water changes in reef tanks typically use RODI (reverse osmosis/deionized) water mixed with aquarium-grade salt, not plain tap water. Trace element levels matter for coral health.
- Cleaning frequency is generally higher: protein skimmer cups every 2–3 days, glass every 3–4 days, and a 10–15% weekly water change as a minimum.
Why Is My Tank Getting Dirty So Fast?
If you are cleaning every week and the tank is still murky or smelly within days, the cause is almost always one of these:
- Overstocking. Fish waste load exceeds what the filter can process. A commonly cited rule is 1 inch of adult fish per gallon, though this is a rough heuristic and breaks down with larger or messy fish like goldfish, which produce far more waste per inch than tetras do.
- Overfeeding. Fish should consume food in under two minutes. Anything that sinks and sits overnight is a waste bomb.
- Undersized or clogged filter. Filter ratings on packaging are almost always optimistic. For a heavily stocked community tank, choose a filter rated for double the actual tank volume.
- Insufficient water movement. Dead zones in the tank accumulate detritus that the filter never reaches. Adding a circulation pump or repositioning the filter outlet helps.
Frequently Asked Questions
How often should I clean my fish tank?
For most community tanks, a partial water change plus gravel vacuum once a week and a filter rinse once a month is the minimum effective routine. Heavily stocked tanks may need twice-weekly water changes. The right answer depends on fish load, feeding habits, and plant density — test ammonia and nitrate weekly and let chemistry guide frequency.
Can I use soap or household cleaners inside the tank?
No. Even trace amounts of soap, bleach, or detergent are toxic to fish. For stubborn algae on decorations or glass, use a solution of plain white vinegar (remove decorations from the tank first, rinse thoroughly, and let dry or rinse multiple times before returning). A dilute bleach dip is sometimes used on equipment — 1 part bleach to 19 parts water for 10–15 minutes, followed by extended rinsing and dechlorination — but this requires care and is not routine practice.
Do I need to remove the fish when cleaning?
No, for regular maintenance. Water changes, glass scraping, and vacuuming can all be done with fish in the tank. Removing fish for a weekly clean is far more stressful to them than leaving them in place. Only remove fish if you need to completely strip down the tank, which should be rare.
What is the fastest way to clear cloudy water?
It depends on the type of cloudiness. White or grey cloudiness in a new tank is usually a bacterial bloom — it clears on its own within a week or two as the nitrogen cycle establishes. Persistent cloudiness in an established tank usually points to overfeeding, overstocking, or a failing filter. A water change helps short-term, but fixing the root cause is the only lasting solution.
How do I know if my filter is clean enough?
Check flow rate. A filter working properly pushes water through at its rated output. If the outflow has noticeably slowed, the mechanical media is clogged and needs rinsing. You can also watch for a fine layer of mulm (grey silt) building up on the substrate near the filter intake — that is a sign suction is reduced and detritus is settling instead of being captured.
Keeping It Manageable
The biggest mistake in aquarium maintenance is letting tasks pile up until the tank is in crisis. Ten minutes twice a week is easier on both you and your fish than two hours of catch-up cleaning every month. Once the rhythm is established — small water change, quick vacuum, wipe the glass — it stops feeling like a chore and starts feeling like the five minutes of quiet observation that make keeping fish worthwhile in the first place.