Extension Cord Storage: Tangle-Free Methods That Last

Extension cords have a talent for turning into a knotted mess the moment you put them away. The good news is that tangle-free storage isn’t complicated — it’s mostly about choosing the right coiling method and a consistent spot to keep each cord. Get those two things right and you’ll spend less time untangling and more time actually using the cord.
Why Extension Cords Tangle in the First Place
Extension cords tangle because most people coil them randomly, letting the cable twist along its natural bend rather than following a neutral loop. Every random loop introduces a half-twist that doesn’t cancel out, so by the time the cord is in storage, it has dozens of locked-in twists waiting to become knots the next time you pull it out. Cord memory — the tendency of the insulation to hold whatever shape it was stored in — makes this worse over time.
Flexible, lightweight cords tangle more easily than heavy, stiff ones, but both types benefit from the same disciplined coiling approach.
Cord chaos is often just one symptom of a bigger clutter problem, so How to Declutter Your Home Step by Step (That Actually Works) is a good next stop if you want to tackle the rest of the house.
The Over-Under Coiling Method
This is the single most effective technique for any cord, cable, or rope, and it’s the one professional riggers and roadies use on cables far more expensive than extension cords.
How it works:
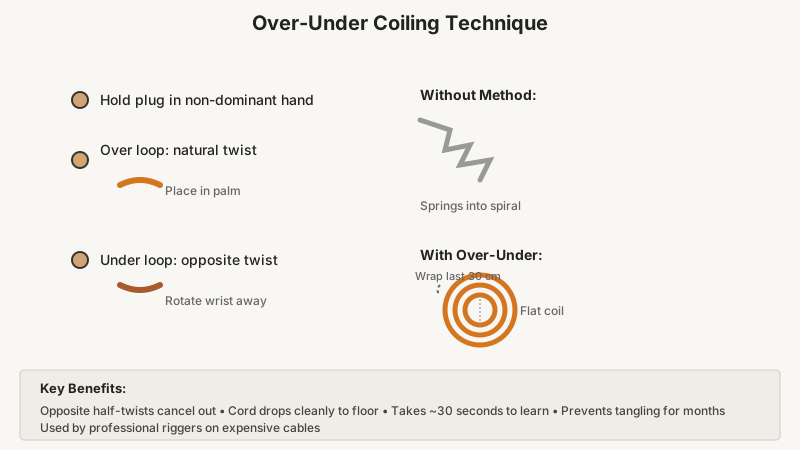
- Hold the plug end in your non-dominant hand.
- Pull out a loop roughly 45–60 cm (18–24 inches) long and place it in your palm — this is an “over” loop, following the cord’s natural twist.
- Pull out the next loop of the same length but rotate your wrist slightly away from you before placing it in your palm — this is an “under” loop, introducing an opposite half-twist.
- Alternate over and under all the way to the end of the cord.
- Wrap the last 30 cm around the bundle twice and tuck the end under the wraps to secure it.
The over-under pattern adds and subtracts the same twist alternately, so the cord lies flat when you uncoil it. You’ll notice the difference the first time you use it: the cord drops cleanly to the floor instead of springing into a spiral.
It takes about 30 seconds of practice to develop the muscle memory. After a week it becomes automatic.
Storage Solutions That Keep Cords Organized
The coiling method matters, but where and how you store the coiled cord matters almost as much. Here are the most practical options, matched to different situations.
If you’re overhauling your storage setup, Best Storage Bins for Decluttering Closets: A Buyer’s Guide can help you pick the right containers for cords and other closet clutter alike.
Velcro Cable Ties or Hook-and-Loop Straps
These are the simplest upgrade over zip ties or twist ties. A reusable hook-and-loop strap keeps the coil from unraveling without permanently deforming the cord. Avoid zip ties pulled tight — they can compress the insulation over time and create a weak point.
Wall-Mounted Cord Hooks or Pegboard
A pegboard panel in a garage or workshop lets you hang each coiled cord on its own labeled hook. The cord stays off the floor, doesn’t get buried under other gear, and is easy to grab and return. Sturdy J-hooks or large plastic pegboard hooks work well for cords up to 30 m (100 ft).
Cord Reels and Retractable Reels
For cords you use frequently — a cord running to a workbench, for instance — a wall-mounted or ceiling-mounted cord reel eliminates the coiling step entirely. You pull out what you need and the spring mechanism retracts the rest. The trade-off: reels are best for a fixed-length regular use case; they’re overkill for a cord you move from room to room.
Plastic Bins with Individual Cord Slots
If you’re storing multiple cords in a bin, the key is separating them. A small plastic bin with dividers, or individual fabric pouches (one cord per pouch), prevents them from interacting with each other. Tossing five coiled cords loose into the same bin is how you get a bin full of tangles by next spring.
PVC Pipe Cord Organizer
A DIY option: cut short sections of 7–10 cm diameter PVC pipe, label each one, and stand them vertically in a larger bin or on a shelf. Drop a coiled cord into each section. The pipe holds the coil’s shape and prevents inter-cord contact. It costs almost nothing if you have scrap pipe.
Labeling: The Step Most People Skip
Knowing which cord is which before you pull it out saves a surprising amount of time. At minimum, mark each cord with:
- Length (e.g., “15 m” or “50 ft”)
- Amperage or gauge, if you have both heavy-duty and standard cords
- Purpose, if it’s dedicated to one tool or area (“workshop”, “outdoor lights”, “generator”)
A strip of masking tape wrapped around the bundle and written on with a permanent marker costs nothing and survives a garage environment reasonably well. Printed label makers hold up better in humid conditions.
Grouping by use — all outdoor cords together, all indoor extension cords together — also reduces the chance you reach for the wrong one.
Special Cases: Long Cords and Heavy-Gauge Cords
Cords over 30 m (100 ft) and heavy-gauge cords (10 AWG or 12 AWG) are stiffer and can kink rather than bend into neat loops. A few adjustments help:
- Make larger loops: increase loop diameter to 60–90 cm for very long cords to avoid stressing the insulation.
- Don’t coil too tightly: a stiff cord forced into a small coil holds that curve permanently, which shows up as a kink mid-length.
- Store horizontally or hang vertically: large coils can distort if left in a compressed stack. Hanging them freely from a hook or peg preserves the coil shape.
- Let the cord warm up before use in cold weather: PVC insulation stiffens in cold temperatures and resists uncoiling. A few minutes at room temperature makes it far more cooperative.
Quick Cord Safety Check While You’re at It
Storage is also a good moment to inspect the cord. Run your fingers along the full length and look for:
- Cracks or brittleness in the outer insulation
- Discoloration or scorch marks near the plug or socket
- Exposed copper wire at any bend point
- A plug that feels loose or wobbles in the cord body
Any of these issues means the cord should be replaced, not stored for next time. Damaged cords are a genuine fire risk, and storing them “to deal with later” usually means using them in a hurry without inspection.
Frequently Asked Questions
Does it damage an extension cord to leave it coiled for months?
Short answer: a properly coiled cord stored in mild conditions is fine. Problems arise when a cord is left in a very tight coil under compression (especially a stiff, heavy-gauge cord), exposed to heat or UV light, or stored coiled while still plugged into an outlet and carrying current. Over-under coiling at a reasonable loop diameter doesn’t damage a cord during normal storage periods.
Can I store an extension cord while it’s still plugged in?
No. A cord coiled while energized — even partially — can build up heat at the coil, since air gaps between the loops limit heat dissipation. Always unplug the cord before coiling and storing it. This isn’t a theoretical risk: it’s the actual cause of some household fires. Cord reel warning labels note this specifically.
What’s the best way to store a cord on a reel?
Retractable cord reels should be fully retracted before storage. For manual reels, wind loosely without forcing the last few feet into too tight a radius at the center. If the reel has a handle, hang it from the handle rather than sitting it on a shelf — that keeps the coil from deforming under its own weight.
How do I stop a coiled cord from unraveling in storage?
A hook-and-loop cable strap (reusable Velcro tie) is the easiest solution. Wrap it around the bundle twice and fasten it. A bungee cord loop, a large rubber band, or the “tuck-under” wrap described in the over-under method above all work too. Avoid tight zip ties, which can indent the insulation.
Does cord gauge affect how I should store it?
Slightly. Thicker (lower-AWG) cords need larger coil diameters to avoid kinking, and they’re heavy enough that they should be hung or laid flat rather than standing on edge. Thin extension cords (16 AWG household type) are flexible enough to tolerate smaller coils and lighter storage solutions like fabric pouches or small hooks.