Smoke Detector Testing & Battery Replacement Done Right

Why Your Smoke Detector Deserves More Than a Once-a-Year Check
Smoke detectors are one of the few safety devices in your home that do almost nothing — right up until the moment they have to do everything. The problem is that most people treat them like smoke alarm mythology suggests: press the test button once a year, swap the 9-volt battery when it chirps, and move on. That approach leaves real gaps.
Fire spreads fast. A working detector gives occupants an extra one to three minutes to escape — a margin that disappears entirely if the battery is dead or the sensor is clogged with dust. The guidance below walks through exactly how to test a detector properly, change its battery without error, and know when the unit itself needs to go.
If you’re already thinking about home safety and upkeep, How to Make Your Home More Energy Efficient: Seal, Insulate, Save offers another set of practical upgrades worth tackling this season.
How to Test a Smoke Detector Correctly
There are two distinct ways to test a detector, and most households only use one of them.
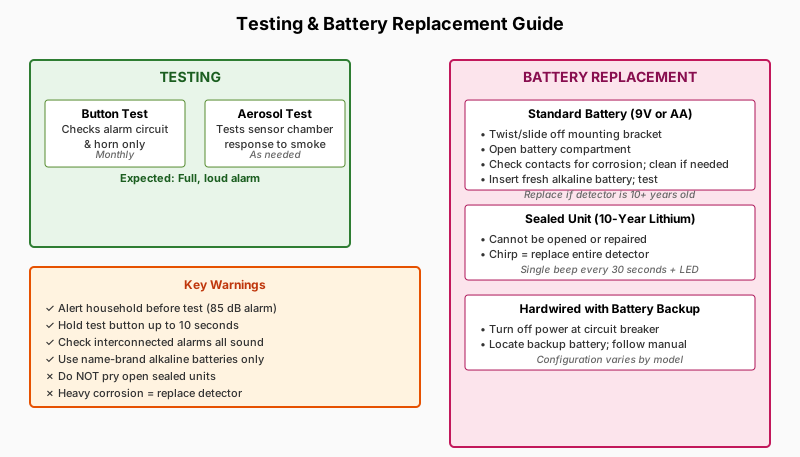
The Button Test
The test button checks whether the alarm circuit and horn are functional — it does not verify that the sensor itself responds to smoke or combustion particles. Still, it’s a necessary first step.
- Alert anyone in the home first. 85 dB at close range is genuinely startling. Tell housemates or family before you press.
- Stand beneath the detector. Some manufacturers recommend holding the button for up to ten seconds before the alarm triggers — don’t assume a brief press is enough.
- Listen for a full, loud alarm. A weak, intermittent, or delayed tone means the battery is low or the unit is failing.
- Check interconnected alarms. If you have hardwired or wirelessly interconnected detectors, triggering one should sound all of them. Silence from another unit is a fault worth investigating.
The Aerosol (Functional) Test
Specialized smoke detector test aerosols are available from most hardware stores. They simulate combustion particles and trigger the sensor directly, confirming the sensing chamber actually responds — something the button test cannot do.
- Hold the can about 12 inches from the detector cover vents and apply a short burst.
- A working detector should alarm within a few seconds.
- Follow the aerosol manufacturer’s instructions for the specific product; some require you to remove the detector cover first.
This test is particularly useful for older units and for ionization-type detectors, where the sensing chamber can become impaired by dust or corrosion without any external sign.
Testing Frequency: More Often Than You Think
The NFPA recommends testing every detector monthly. That sounds excessive until you factor in how quietly a 9-volt battery drains over 12 months in a warm attic hallway, or how a spider builds a web inside a sensor chamber in a basement.
Changing the Battery: Step-by-Step and Material-Specific
The process varies slightly depending on what type of detector you have. Getting it wrong — especially with sealed-battery units — is a common and fixable mistake.
Standard Battery-Powered Detectors (9V or AA)
- Twist or slide the detector off its mounting bracket. Most models rotate counterclockwise about a quarter turn; others slide straight down.
- Open the battery compartment. On most units, this is a hinged or sliding door on the back or side.
- Remove the old battery and check the contacts. Look for corrosion (white or greenish residue). Light corrosion can be cleaned with a dry cotton swab; heavy corrosion means replace the unit.
- Insert a fresh battery. Match polarity markings carefully. Use a name-brand alkaline battery — off-brand batteries can have inconsistent voltage output.
- Press the test button before remounting. If the alarm doesn’t sound with a fresh battery, the detector itself is faulty.
- Reattach to the bracket and verify it locks securely.
When to replace: Even with a fresh battery, replace any detector that is 10 years or older from its manufacture date (usually printed on the back). Sensors degrade over time regardless of battery condition.
Sealed, Long-Life Battery Detectors (10-Year Units)
Many newer models ship with a non-removable lithium battery designed to last the life of the unit — typically 10 years. When these chirp, the detector cannot be repaired; the entire unit must be replaced. The chirp pattern is usually a single beep every 30 seconds accompanied by a red LED flash.
Do not attempt to pry open or retrofit a sealed unit. Replace it with a new detector.
Hardwired Detectors with Battery Backup
- Turn off the power at the circuit breaker supplying that detector. Verify the power is off by pressing the test button — no sound with no battery installed confirms it.
- Remove the detector from its mounting bracket.
- Disconnect the wiring harness (the small plug connecting the detector to the in-wall wires).
- Open the battery compartment and swap the backup battery — usually a 9V or CR123A lithium.
- Reconnect the harness, remount the detector, and restore circuit breaker power.
- Test the unit to confirm normal operation.
Safety note: If you are unsure which breaker controls a hardwired detector, use a non-contact voltage tester before touching any wiring.
Detector Types and What They Actually Detect
Understanding the two main sensor technologies helps you interpret test results and placement choices.
Ionization detectors respond quickly to fast-flaming fires that produce small combustion particles. They’re typically more sensitive to kitchen flare-ups and paper fires, which is why placing them directly outside a kitchen (rather than inside) reduces nuisance alarms without sacrificing meaningful coverage.
Photoelectric detectors respond more quickly to slow-smoldering fires — upholstered furniture, electrical wiring — that produce large visible particles before open flame appears. Smoldering fires are particularly dangerous because they generate carbon monoxide and can go unnoticed for hours.
Combination (dual-sensor) detectors cover both scenarios and are increasingly common. Some fire safety authorities, including the NFPA, advocate for having both types or combination units in living areas and bedrooms.
Placement, Maintenance, and Common Mistakes
If you’re settling into a new place and sorting out detector placement along with everything else, How to Make Moving to a New Home Less Stressful: Start Early, Stay Calm can help you handle the whole process with less stress.
Where Detectors Should — and Shouldn’t — Go
- Minimum placement: On every level of the home, inside each bedroom, and outside each sleeping area.
- Avoid: Within 10 feet of a cooking appliance (ionization types especially), near bathroom steam, or near HVAC supply vents that can dilute smoke before it reaches the sensor.
- Ceiling vs. wall: Mount on the ceiling, or on the wall 4–12 inches below the ceiling. Smoke rises and banks along the ceiling before descending.
Cleaning the Sensor Chamber
Vacuum around — not inside — the detector vents with a soft brush attachment every six months. Do not spray compressed air directly into the chamber; the pressure can damage the sensor. A clean exterior reduces the chance of dust triggering false alarms or blocking smoke entry.
The Chirping Hierarchy
- Rapid multi-beep pattern: Active smoke/alarm condition. Evacuate.
- Single beep every 30–60 seconds: Low battery or unit end-of-life warning.
- Continuous random chirps or a distinctly different tone: Possible malfunction. Replace the unit.
If a fresh battery doesn’t stop the chirp, the problem is the detector itself, not the power source.
Frequently Asked Questions
How long does a smoke detector battery actually last?
Typical alkaline 9-volt batteries last roughly 8–12 months in a smoke detector under normal temperature conditions. Lithium 9V batteries can last longer — some manufacturers claim up to 5 years — but the battery and the sensor are two separate things. A battery outlasting the detector’s useful life is entirely possible in a 10-year-old unit.
My detector keeps chirping even after I replaced the battery. What’s wrong?
First, confirm the new battery is fully seated and the contacts are clean. If it still chirps, check the manufacture date on the back of the unit. A detector that’s 10 years or older is past its service life and the chirp is the end-of-life signal, not a power warning. Replace the whole unit.
Can I use any 9-volt battery, or does the brand matter?
Brand matters more than most people realize. Generic or heavily discounted 9V batteries sometimes have lower than nominal output voltage or higher internal resistance, which can cause low-battery chirps prematurely or fail to deliver sufficient current during an alarm test. Stick to name-brand alkaline or lithium cells.
How do I silence a nuisance alarm without disconnecting the detector?
Most detectors have a hush button that suppresses the alarm for approximately 8–10 minutes, allowing minor cooking smoke to clear. Pressing the test/silence button once during an active alarm (not a fire situation) triggers this mode. Do not remove the battery to silence alarms — it’s a safety habit that too easily becomes permanent.
Do I need both a smoke detector and a carbon monoxide (CO) detector?
Yes. CO is odorless and colorless; even combination smoke detectors without a dedicated CO sensor will not detect it. Combination smoke-and-CO units exist and are a practical choice for bedrooms and hallways near attached garages or fuel-burning appliances. The NFPA and most local codes require CO detectors in any home with an attached garage or a fossil-fuel appliance.
Putting It Together
A functioning smoke detector is as much about habits as hardware. Test monthly, vacuum the vents twice a year, replace batteries proactively rather than reactively, and track the manufacture date on every unit in your home. When a detector hits 10 years, replace it — the sensor itself ages out, independent of how new the battery is.
The button test takes 30 seconds. The aerosol test takes two minutes. Neither is a burden. What they give you is the realistic confidence that the device will actually do its job when the stakes are highest.